What is more awesome that owning a Canon L lens? Drinking from it! Kudos to Canon for making us fanboys drool all over again this awesome giveaway. They previously brought out the Canon EOS 5D Mark II flash drive and now this! It will even be more shocking if this mug is also "stabilized."
Using extension tubes is one of the cheaper alternatives in doing macrophotography. These tubes are exactly just that, tubes that extend or move the lens away from the camera film or digital sensor. As a result, the lens can focus closer, magnifying the subject in the process. The longer the extension, the greater the magnification.
You will be encountering 3 limitations though. First, extension tubes cause light loss. The farther the lens from the camera film or digital sensor is, the greater the light loss. As a result, this will cause a darker viewfinder and longer exposures.
Second, the longer the lens' focal length, the lower will be the magnification. Conversely, the shorter the focal length, the higher the magnification. This can be computed using the formula below
M = Y/X
where:
M = magnification Y = total length of the extension tubes in mm B = lens' focal length in mm
As a result, if you have a 50mm lens and the total length of the extension tubes is 68mm, magnification will be 1.36x or 1.36:1. On the other hand, if you have a 100mm lens attached to a 68mm extension tube, the magnification will just be less than life-size or 0.68x to be exact.
Third, the shorter the focal length of the lens, the closer the subject needs to be to the lens to achieve focus. All lenses has a minimum focusing distance. For example, the minimum focusing distance of the Canon 50mm lens is 0.45m or 1.5 ft. Attaching a 68mm extension tube to this lens results to a reduction in the minimum focusing distance to about 4 inches. If you are dealing with a lens whose focal length is shorter than 5omm, there will be a high probability that the minimum focusing distance between the subject and the lens will be very small. This will be quite impractical if your potential subject is an insect.
By the way, you may be wondering what is the process for computing the minimum focusing distance for a lens attached to an extension tube. It is not quite exact, well as per my research, but I found a great forum thread which discussed this topic.
There are many types of extension tubes depending on the manufacturer. One of the most popular, which I currently use, is manufactured by Kenko (see image above). It is composed of 3 tubes with various lengths, 12, 20 and 36mm respectively. You can use the tubes separately or you can combine or stack all three to get the 68mm length. Images from Amazon
Canon has its own set of extension tubes, albeit more expensive than the Kenko tubes. One is 12mm in length while the other one is 25mm. You can also use these tubes separately or you can combine both to get 37mm.
If you like to experiment or the Do-It-Yourself (DIY) type, you can also make your extension tube. As I mentioned above, the concept behind these tubes is just to move the lens away from the camera film or digital sensor. If this is the case, you can use any material for the tube as long as it is sturdy and you can place the right adapters so that you can attach it to the lens and camera body. I found two DIY extension tube examples from the Net, one made from a PVC pipe and the other one from a Pringles can, both did a great job in getting great macro images.
You may be asking now, what is the difference then between the DIY and the commercial tubes (except of course for the price). Well, from my standpoint, that will just be the presence or the lack thereof of electronic contacts connecting the lens and camera body. The commercial tubes have electronic contacts which allow you to get camera metering and even focusing. For the DIY tubes, these do not have the contacts thus you need to manually set the metering and even the aperture of the lens. I will be discussing how to do this in my next post when I tackle how to use reversed lens where you will encounter the same problem, the lack of electronic contacts between the lens and the camera.
To give you a sample of what you can get using extension tubes, you can find below a slideshow of the images I captured using a Canon 50mm lens and Kenko extension tubes.
Magnification is the differentiating factor between macrophotography and closeup work. Anything equal to or higher than 1x magnification (or 1:1 which means the image is the same size as the object being photographed), this is considered to be a macro. Anything lower than 1x magnification is considered to be a closeup.
To measure the magnification of your macro gear setup, get a ruler with mm scale. Take a picture of the ruler focusing on the mm scale. Ensure that you will be able to get a measurement of the image's width in mm. Now, get the width size of your digital camera's sensor. For example, for a Canon 40D, it's 22.2mm. A great resource for this information is Digital Photography Review. Now, divide your sensor's width to that of the width in mm from your image.
As an example, based on my test image below, the width's size is approximately 13mm. Using the Canon 40D sensor size, we divide 22.2mm with 13mm.
Click image to enlarge.
22.2/13 = 1.7. As a result, the magnification of this macro gear setup is about 1.7:1 or 1.7x magnification.
Another example based on my test image below, the width's size is approximately 6mm.
Click image to enlarge.
22.2/6 = 3.7. This is equivalent to 3.7:1 or 3.7x magnification. This is already enough to make a tight portrait of an ant or fly.
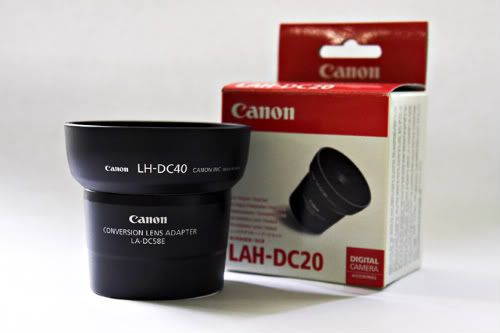
I started with macrophotography when I bought the Raynox DCR250 out of curiosity. This is a closeup filter that you can snap-on to lenses with 52 to 67mm filter sizes. This is how the Raynox looks like attached to my Canon S2 IS via the Canon Conversion Lens Adapter (LAH-DC20).
Click image to enlarge.
This setup is not for the faint of heart though. It looked deceptively simple but when the lens is zoomed to its maximum (equivalent to 432mm), you will get about 2x magnification. At this magnification level, a slight twitch from your subject or a light breeze will look like a storm of movement from the viewfinder. If you do not have a stable support or your blood is laced with caffeine, you will always end up with blurry images.
You can find below a slideshow of the images I captured using the Raynox.
By the way, you may be wondering what is that thing covering the pop-up flash. That is my home-made flash diffuser cut from a small water sprayer. It is a big help in cutting down the harshness of the light from the flash, all the more essential when you are close to your subject.
These are my current camera gears. One is more than 20 years old while the other one is 3 months old.
I was very lucky when I had the privilege to buy Daniel Go's Canonet G-III QL17. I had been looking for one for quite some time now since I am very interested in trying my hands on film. My heart skipped a beat when I laid my hands on this beauty. The sheer simplicity and quality made me understand why the camera lasted and still operational for all those decades.
I sold my Canon 350D which was my photography companion and provided me with great service for 2 years. I decided to sell it though to utilize the new technologies and features found in the Canon 40D. This new model is a beast in terms of features. What I had a hard time doing in my 350D, I can easily accomplish with the 40D.
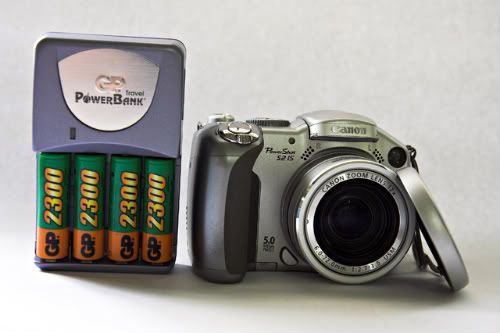
This was the camera that opened my world to the beauty and challenges of photography. It was a Canon S2 IS and even if it was a point and shoot camera, through it, I was able to learn the foundations of photography and got amazing pictures.
The most important accessory I bought for the S2 IS was the Canon Conversion Lens Adapter (LAH-DC20).
Through this adapter, I was able to attach filters in front of the lens. My two most favorite filters were a close-up filter (for macrophotography) and an infrared filter (for infrared photography). You can find below two pictures I took using the S2 IS with these filters.
Macrophotography
Infrared Photography
I would be explaining in details in later posts about the gears and workflow I used to get the two pictures above.